Showing posts with label Saving Money. Show all posts

Friday, August 16, 2013

Another Nightstand Transformation

I did a nightstand DIY before...


But this one is a little more time consuming... I had to transform this little dresser because I HATED it's "decorative accents". But it was basically free and I needed a little table... so a little elbow grease helped me do this... and I LOVE it!!


Here's how I did it...


3 simple steps. I just pried off those accent thingys (super technical word usage - I know) with a flat head screwdrive and pliers. Then I sanded. Alot. Then I spray painted (didn't want paint streaks). Make sure to sand inbetween painting but make sure the paint is totally dry. I did 3 coats of spray paint in a high gloss white. Love it!

Then just replace the drawers with some new ones and viola! New table! It looks totally different!


Easy peasy..

Stay tuned for how I transform this awesome chair I found on the SIDE OF THE ROAD!! What??
Why do people throw away perfectly fine pieces of furniture... Their trash is my treasure!!


Saturday, February 2, 2013

$0.00 Diaper Box Makeover

What's better than a REALLY good DIY?? A really good CHEAP a.k.a. almost FREE DIY!! Which is what this is!! Woo!! And I'm all about decorating on the cheap...

I had this idea a while ago and searched for it on Pinterest but couldn't find it.. and it's so obvious I thought!! So without further ado.. I introduce the basically FREE...

That's right, you read correctly. Paint sticks. FREE!!! Genius?? Yes.

I'm a fabric hoarder so I already had the fabric and spray paint on hand already so this project was COMPLETELY FREE! Can't be that! Free always fits in my budget!

Want to know how to do it??

What You'll Need:

-Diaper Box
-50 Paint sticks (roughly - depending on size of diaper box - mine took 10 sticks on short side and 15 on the long side)
-Spray Paint (or stain for the paint sticks)
-Fabric for inner part of box
-Fabric for fold over part of box
-Glue Gun


Start with your empty diaper box, get a sharp knife (or scissors) and cut off the tabs on top...


Now grab your paint sticks, and a good movie to watch, because this part takes a little bit...


I recommend laying out your paint sticks on the side of the box first to make sure that you can fit them comfortably.. Like I said, I found that my diaper box needed 10 for the short sides and 15 for the long sides..


Take your handy dandy hot glue gun and you need to move kind of fast for this part... run a strip of glue down the printed side of your paint stick and quickly stick it on the box. Press down on it until the glue is dry... If you don't move quickly enough, your hot glue will dry before your stick is on the box... so chop chop people!


All done!! Doesn't it already look better?? And don't worry about the paint sticks coming above the top of the box... those are getting covered with fabric anyways, but you can always cut down your paint sticks so that they are the exact same height as your box.

Now take your handy dandy spray paint (or stain) and paint your box!! I used this... which is my favorite!!

Rust-Oleum Heirloom White in Satin
I know, I know, it's obviously freezing outside, but I wanted this project done!!!!! Place your paint-sticked box upside down and paint!! Make sure you get the bottom of the box so you can't see any of the original colors...
No Coat

One Coat

Two Coats
See how you can't see any of the original color?? That's what we want!!

Now, onto the lining of your box..get your fabric and measure how big you need to make your peices...


They should look like this once you're all done cutting them out...


 Measure the size for the outside fabric of the box.. in my case, it's the green fabric. I wanted to make sure that it covered the divets in the paint sticks... Add a little extra length so that there's a little bit of fabric in the box.. make sense?? Oh goodness, I hope so.. It's so much easier for me to do it than to explain... that's my weakness..

Those should look like this when you cut them out..


 Now, sew the edges together with all your pieces.. should look like this..


 Now... take the fabric for the inside of your box, and sew up the remaining edges... It will look like this when you're done...


Attach your outer fabric, and it will look like this...


Try to match up your seams, it will look much better if you do...

No, hem the outer fabric, so that it has a nice finished look when you put this in the diaper box...


Now you're done!! Just slip your fabric into the box.. this could take some time to get it to sit right, and Viola!! Totally free diaper box makeover!! So much cuter and way more fitting for my home!!


You could finish it off with attaching some handles or something or painting something on the sides, but I like this clean look. It will look great in my bedroom against the dark gray walls! So excited!!

Best part ... TOTALLY FREE! Woo!!!

I hope this tutorial made sense, if it didn't (which is very likely) or you have questions, feel free to leave a comment and I'll try my hardest to explain better!!

Happy Crafting!!


Saturday, January 26, 2013

DIY Painted Headboard Tutorial

What's happening?! I'll tell you. I am going to show you how to get your very own, SUPER cheap DIY Painted Headboard!! I LOVE it!! I've seen a lot of versions on pinterest, but not one quite like mine (that doesn't mean someone smarter than me already did it exactly the same way)... It was SUPER easy to do and only cost me a couple bucks as opposed to a couple hundred or thousand an actual headboard would cost.. and remember people, I'm all about decorating with a budget, or more accurately, NO money.

Check out these lovely painted headboards - there are SO many creative people out there!!


 polka dots - source
mountain - source
turquoise monogrammed - source
white oultine on gray - source

The last one is the most similar to mine, and I loved the idea of leaving my whole headboard dark..but that's a lot of dark in one room... In the above pictures, they have white walls as well so it's a little easier for their room to not look like a cave... like mine would...

To begin, you need tape - GOOD tape, not crappy tape, we don't want paint bleeding here people!! The less touch-ups you have to do, the better..you can spend all that extra time playing cars with your son!

So.. measure where you want your headboard to go on your wall - make SURE you are TOTALLY HAPPY with the placement as you are stuck with it once it's painted!! No rearranging allowed!!


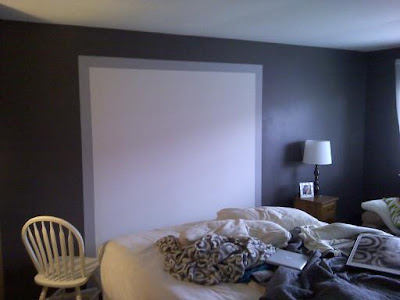
 I have a king sized bed and I wanted this headboard to be wider than my bed... so mine measured 80 in wide... and about 6 1/2 feet tall. I wanted it to make a statement!

Now paint all around your tape with your background wall color...


Now, my headboard has two colors to it. The main color is white... and the border around my headboard is a light gray. If you want a border, tape that off.. I just added another tape row to my outline.. does that make sense??

Paint your main color, and then when that is dry peel the tape off, and re-tape around your border.. I should have taken a picture of that step, but you get it right??


Here it is totally painted.... Like I said, the main part is white, and the outline is a light gray. It makes for a smoother transition than just dark gray to white I think..


I don't know why these are uploading blurry... I lose. But you get the idea, just ignore my gross nightstands and mismatched lamps... It'll look much better once I get to tackle those... but for now... Here's what my room looks like!! I LOVE it!! Such an improvement!! Do you remember what is was before??

Ugly. That's what it was. And while some parts might still be ugly here, it's still an improvement.


Total Cost for my Painted Headboard:
White Paint = Free (got it from my apartment complex)
Light Gray Paint = $2.50 (used a sample paint jar from Home Depot, just had them make it in the color I wanted)
Painters Tape = Free (I already had a lot)
Paint Brushes = Free (already had those too)


Can't beat $2.50 for a headboard, I win!!!!

Wednesday, January 16, 2013

Thrift Store Score - Bedroom Accessories!

When decorating on a budget (and even sometimes when you're not) thrift stores and garage sales are your best friends!! You can usually find really beautiful things for not a lot of money!

Today, I packed up my babies in the FREEZING Chicago weather and we headed on over to our local thrift store, Savers. I LOVE shopping here - partly because it's cheap - but also when I donate something, they give you coupons ... and who doesn't love to use coupons on items that are already cheap to begin with! Woo!!!

Now - since I've set myself a budget for my Master Bedroom overhaul, I've got to be REALLY creative about where and how I accessorize. Thrift stores are the perfect place for me to look and I did find some goodies!

First off - these three Mercury Glass Christmas ornaments - and they are LARGE!! I love them, they'll look so cute in a tray or one alone - and just because they're technically an ornament, doesn't mean that I can't use them year round - an ornament doesn't need to be an ornament, it can just be a pretty ball too.


I also found this heavy silver candlestick and a little glittery candle to go with it - who doesn't love bling??


Now, let's talk money -

Those mercury glass balls were originally $1.99 a peice, but since they were Christmas they were an additional 75% off - plus I had a 20% off coupon. They were basically free. Best. Decor. Ever. Minus what I paid for them, they're pretty similar to these ones (if you want to splurge):

source
The silver candlestick holder and candle were each $1.99 a piece too - I got 20% off of those so I think they were around $3.00 for both of them. Not as good as the balls, but not bad either.

But my MOST favorite thing that I bought today cost me a whopping $2.40. It is insanely adorable, and will make me and my baby boy happy lots and lots of times! It makes me happy just looking at it knowing how much I paid for it!


It's a vintage George Imports airplane music box that plays "Fly Me to the Moon". I'm in love with it.
It will be SO adorable in my kids room! Max LOVES airplanes, and I LOVE it.

So, for well under $10.00 - I got 6 things - 5 of which are for my bedroom. It was a very successful outing! Yay for thrift stores!!