Showing posts with label My Home. Show all posts

Tuesday, March 19, 2013

Light & Bright Entryway!!

The first place that people see when they come into my quaint little home, is the entryway. That's also where the nasty shoes, coats, and mish-mosh of forgotten mail goes. Those two = don't mix.

Which is why I was SO sad for SO long that this is what people saw when they walked in my house...


Gross. What kind of a greeting is that?? Dirty mirror, stinky shoes, and usually a messy table top. I may or may not have cleaned it off for this picture in an attempt to show that it really wasn't so bad, but it was.

After brainstorming for a little bit, and thanks to redoing my bedroom.. I figured out a solution!! I swapped some furniture, moved around some decorations like this pretty mirror, thrifted some new accessories, and VIOLA!! Light and bright entryway!!

SUCH SUCH SUCH an improvement!!!


Complete with pretty little accessories!!!


...and an ever so gentle reminder to be happy!!


But want to know what I love most about my entryway???


Yep. You guessed it. DRAWERS TO HIDE THE NASTY SHOES!! Woo!!! Now this is all people see when they walk in not nasty dirty shoes!! *swoon*. (because your own house should make you swoon)

One more time...


:)

Saturday, February 23, 2013

NO SEW Diaper Box Makeover


Let's get down to business...to defeat the huns! I have a LOT of diaper and wipes boxes. LOTS. I hoard them so that I can do things like this!! 

Today, I got the itch to organize. I even opened up a new board in pinterest... I knew exactly where I wanted to go first. The dreaded hall closet upstairs which has been neglected since I moved into this apartment. Well, I shouldn't say neglected.. I throw things in there when I don't know where else to put them. 

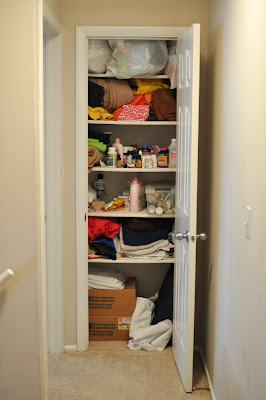
Take a look at my nasty closet and keep your judging to yourself :)


Gross. See what I mean about things just being thrown in there. Literally. It's embarassing. Try not to look at those pictures again... instead, let's view the disaster close up...


 What do those two shelves need? (Besides a trash can)

BOXES!!!!! Something pretty to store everything THAT NEEDS TO BE THERE!!! Need is the key word here people. I threw away a whole trash bag full of crap from just this little closet.

So I put on my thinking cap, pulled out an unused wipes box, some fabric, my handy dandy glue gun and whipped these babies out.

You will not BELIEVE how easy it is! Best part... FREE. I'm a fabric hoarder remember??


 Here's how you do it in pictures:


Pull fabric up around box and hot glue in place.. don't worry about it looking junky, we'll fix that later

where the fabric folds over... don't worry about this junkiness either, it's getting fixed. WITH RIBBON! WOO!
cut ribbon a little longer than the height of the box, place over those nasty seams (as seen above) an attache at both ends

should look something like this - you only need to glue the top and bottom part of the ribbon - if you pull tight enough the ribbon won't gape on the box. It will look like it's glued down... without being glued down.... make sense??
attach the ribbon to the inside of the box also - to cover up that junkiness from earlier... glue both edges of the ribbon as well as your starting and stopping point

will look something like this - but your corners should be flat... I obviously messed up on that corner. Boo.
I made a cute little bow with the leftover ribbon and attached it to the middle... but you don't have to do that.

SO easy. In fact, it was so easy, that I made two!!! But I made the second just a teensy bit different...

BEFORE
AFTER
  I love them. They're so pretty and FUNCTIONAL!! Which is the best.


They made such a different in my closet too... here are the before and after's of my shelves...

BEFORE

AFTER


BEFORE

AFTER
  
Organizing is a work in progress!! My one day focusing on my closet only got me this far - which is a HUGE improvement, but my closet is NO WHERE near organized enough! I still have to deal with the trash bags full of fabric on the top shelf... I told you I hoard it.  For now, let's just focus on the beautiful new boxes that store everything I need them to and the fact that those two shelves, at least, look SO much better!!

Organizing can be fun. Plus, if you want to be happy, an organized home never hurts.

 Your turn!!
   

Sunday, February 17, 2013

New Couch! Woo!

2nd phase of decorating my family room was to buy a new couch! Woo!!!! I had LOTS and LOTS of ideas of what I wanted... I knew I wanted a gray couch, and I wanted it to be pretty. The hubs wanted it to be comfy. So we spent lots and lots of hours going from furniture store to furniture store searching, and sitting, and comparing...

In the end, this beauty won us over...


She's smaller than our previous sectional.. in fact, she's not a sectional at all. Just an oversized sofa with a chaise. An AWESOME chaise. It's like 4 feet wide. Talk about cozy. It even comes with those adorable gray and green pillows- which are basically perfect.

We bought it from Ashley Furniture. It was kind of pricey, but we got a "manager's special" for buying it this weekend, and that saved us a couple hundred dollars. Add in the money we made from selling our couch and my green rug and an end table, and she didn't end up costing us a ton of money. Woo!!!

We even had enough left over to buy these two lovelies to add to our room...
$20.00 coffee table from Ikea - I've got plans for this baby :)
I was going to buy a coffee table from Goodwill or something and just refinish it, but I figured for $20.00, I could just get a new one that matched all our other furniture in the room. The hubs agreed. Which is all I need.
$20.00 Rug from Ikea - She's 6'x4' - pretty big for such a small price tag...
 I can't wait for our couch to be delivered on TUESDAY!! Holy fast!! It will look so pretty in here!!

Stay tuned for a new tutorial coming this way... how to make a $5 lamp look like a $50 lamp!!


Exciting things!!

Wednesday, February 13, 2013

Family Room

oooo!!! I've been BIZ-AY!! Lots and LOTS of ideas are just running rampant through my mind!! I've been spending all this time working on my family room ... well planning it. After all, good designs that stay in budget require planning! LOTS of planning!!

But Phase 1 is complete!!! Get rid of the HUGE, OVERSIZED, UGLY tan sectional! It sold last night! Woo!!


Look how huge that is in this room?? It basically takes up the whole space. So glad it's gone!!

Now the hubs and I get to couch shop, which I happen to think is SO fun! Seriously!! Our next couch will be much more appropriately sized...and pretty. It will be pretty. Check here for what I'm thinking couch wise...

For now... let your mind be completely confused by this sneek at my next project....


Well... it's really not a sneek...but what would I need all the wall measurements for??? Hmm....


Ponder that.
Check back soon!

Saturday, January 26, 2013

DIY Painted Headboard Tutorial

What's happening?! I'll tell you. I am going to show you how to get your very own, SUPER cheap DIY Painted Headboard!! I LOVE it!! I've seen a lot of versions on pinterest, but not one quite like mine (that doesn't mean someone smarter than me already did it exactly the same way)... It was SUPER easy to do and only cost me a couple bucks as opposed to a couple hundred or thousand an actual headboard would cost.. and remember people, I'm all about decorating with a budget, or more accurately, NO money.

Check out these lovely painted headboards - there are SO many creative people out there!!


 polka dots - source
mountain - source
turquoise monogrammed - source
white oultine on gray - source

The last one is the most similar to mine, and I loved the idea of leaving my whole headboard dark..but that's a lot of dark in one room... In the above pictures, they have white walls as well so it's a little easier for their room to not look like a cave... like mine would...

To begin, you need tape - GOOD tape, not crappy tape, we don't want paint bleeding here people!! The less touch-ups you have to do, the better..you can spend all that extra time playing cars with your son!

So.. measure where you want your headboard to go on your wall - make SURE you are TOTALLY HAPPY with the placement as you are stuck with it once it's painted!! No rearranging allowed!!


 I have a king sized bed and I wanted this headboard to be wider than my bed... so mine measured 80 in wide... and about 6 1/2 feet tall. I wanted it to make a statement!

Now paint all around your tape with your background wall color...


Now, my headboard has two colors to it. The main color is white... and the border around my headboard is a light gray. If you want a border, tape that off.. I just added another tape row to my outline.. does that make sense??

Paint your main color, and then when that is dry peel the tape off, and re-tape around your border.. I should have taken a picture of that step, but you get it right??


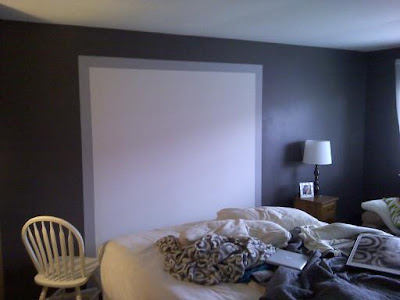
Here it is totally painted.... Like I said, the main part is white, and the outline is a light gray. It makes for a smoother transition than just dark gray to white I think..


I don't know why these are uploading blurry... I lose. But you get the idea, just ignore my gross nightstands and mismatched lamps... It'll look much better once I get to tackle those... but for now... Here's what my room looks like!! I LOVE it!! Such an improvement!! Do you remember what is was before??

Ugly. That's what it was. And while some parts might still be ugly here, it's still an improvement.


Total Cost for my Painted Headboard:
White Paint = Free (got it from my apartment complex)
Light Gray Paint = $2.50 (used a sample paint jar from Home Depot, just had them make it in the color I wanted)
Painters Tape = Free (I already had a lot)
Paint Brushes = Free (already had those too)


Can't beat $2.50 for a headboard, I win!!!!

Wednesday, January 23, 2013

Firewood & Technology

We got this stack of beauties delivered yesterday...


and then build this lovely...


 ahh.... hello lover.

Fireplaces with fires have to be the most cozy thing in the world...especially is freaking cold Chicago.. it's like -13 outside.... plus, it's snowing.
I just want a fire, all day, every day.


In other news, I'll leave you with some recent pics from our lives...

I must be the best mom ever... seriously.. Brave and cheez-its for breakfast. I rock.


Talking to grandma and grandpa - technology does amazing things
watching Mickey, with Mickey, before going to bed in his Mickey pajamas. Obsessed??


Basically, life is pretty simple and sweet lately... and warm.